Category: Uncategorized

  • Food-Grade Poly Bags: FDA Compliance and What to Specify

    Food-Grade Poly Bags: FDA Compliance and What to Specify

    A clear plastic bag and a food-grade plastic bag can look identical and cost about the same, yet only one of them is legal to put against a sandwich, a loaf of bread, or a tray of cookies. The moment a poly bag makes direct contact with food, it becomes a regulated food-contact article, and “it’s just plastic” is not a defense a health inspector accepts. If you package anything edible, here is what food-grade actually requires and what to put on the order so you can prove it.

    What “food grade” means in the regulation

    In the United States, the governing rule for polyethylene food-contact film is 21 CFR 177.1520, the FDA regulation covering olefin polymers used with food. It defines the approved resin composition, caps the additives a compliant film may contain, and sets the conditions of use the material is cleared for, from freezer temperatures up to boiling-water contact depending on the resin. A bag qualifies not because a label says “food safe” but because the resin and everything blended into it fall within that regulation.

    Low-density polyethylene, the workhorse resin for flexible bags, earns food-grade status largely through what it does not contain. Compliant LDPE carries no plasticizers, no phthalates, and no meaningful quantity of extractable additives; its flexibility comes from the branched structure of the polymer itself rather than from softeners that could migrate into food. Natural and white grades generally comply on their own. Add a color, and the burden shifts: a black or tinted bag is only food grade if the colorant, carbon black included, is itself cleared for food contact.

    Virgin resin, recycled content, and why the difference matters

    For anything touching food directly, virgin resin is the default and the safe answer. Recycled content is where buyers get into trouble. Post-consumer recycled plastic can carry residual substances from its previous life, so using it in direct food contact generally requires that the specific recycling process has been reviewed by the FDA and received a letter of non-objection. That is a property of the recycler’s process, not something a bag converter can assert casually. If sustainability goals are pushing you toward recycled material, keep the recycled layer or the recycled bag on the outer, non-food side of the package and reserve virgin, compliant film for the surface that meets the product.

    This is also why “food grade” and “recyclable” are separate questions that people constantly conflate. A bag can be fully compliant for food contact and still be hard to recycle, or be made partly of recycled resin and not be cleared for direct contact. Specify each requirement on its own rather than assuming one implies the other.
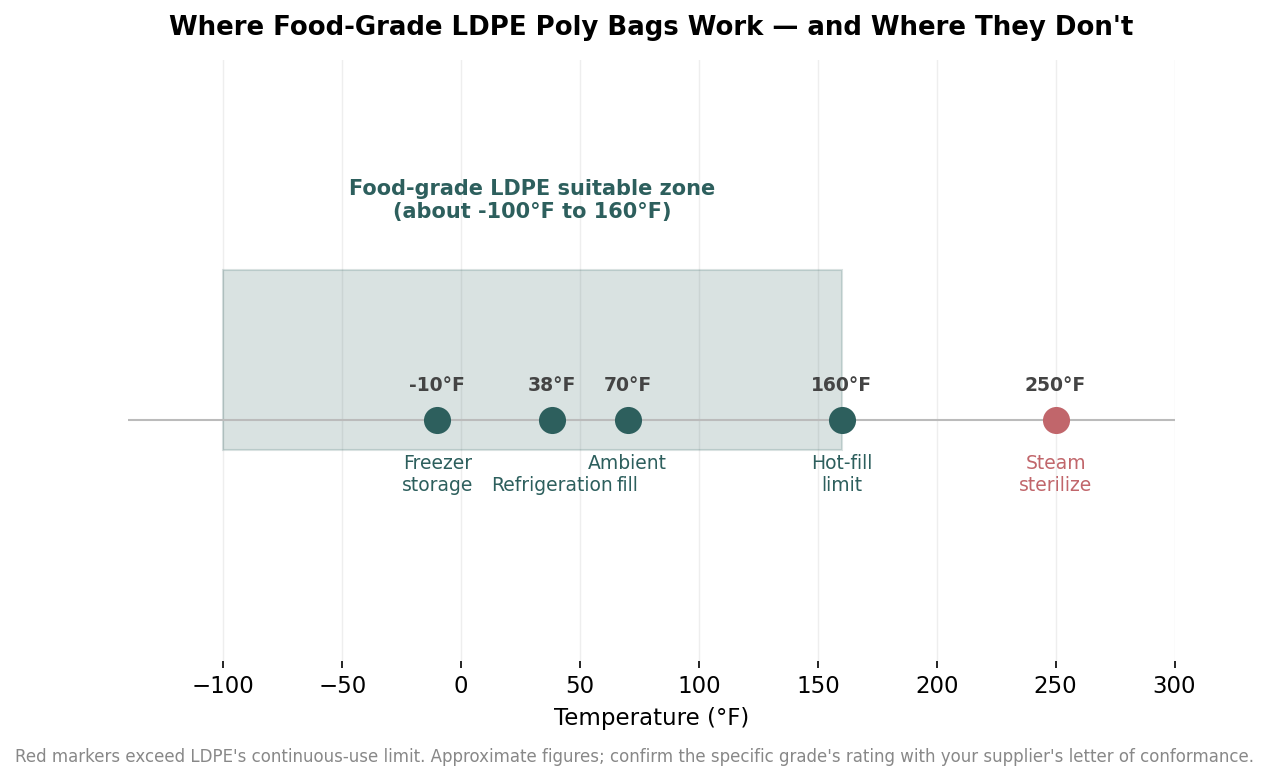
    Temperature number line showing food-grade LDPE poly bags suitable from about -100F to 160F, with freezer, refrigeration, ambient and hot-fill within range and steam sterilization at 250F outside it
    Food-grade LDPE covers freezing through ambient packing but is exceeded by hot-fill and steam processes.

    Temperature is the spec that quietly disqualifies bags

    The most common food-grade failure is not chemical, it is thermal. Food-grade LDPE has a continuous-use ceiling around 160°F and stays serviceable in a freezer down to roughly -100°F, which comfortably covers refrigeration, frozen storage, and ambient-temperature packing. What it does not cover is heat. A hot-fill process near or above 160°F, a steam or boiling sterilization step, or a bag a customer might microwave will push LDPE past its limit, where it can distort, seal poorly, or lose the integrity the compliance letter assumed.

    When the application runs hot, the answer is a different resin, not a thicker LDPE bag. High-density polyethylene tolerates roughly boiling-water temperatures, and polypropylene handles more still, which is why boil-in-bag and higher-heat food packaging leans on those materials. Match the resin to the hottest and coldest point the bag will actually see in your process and in your customer’s kitchen, then confirm that exact grade is rated for it.
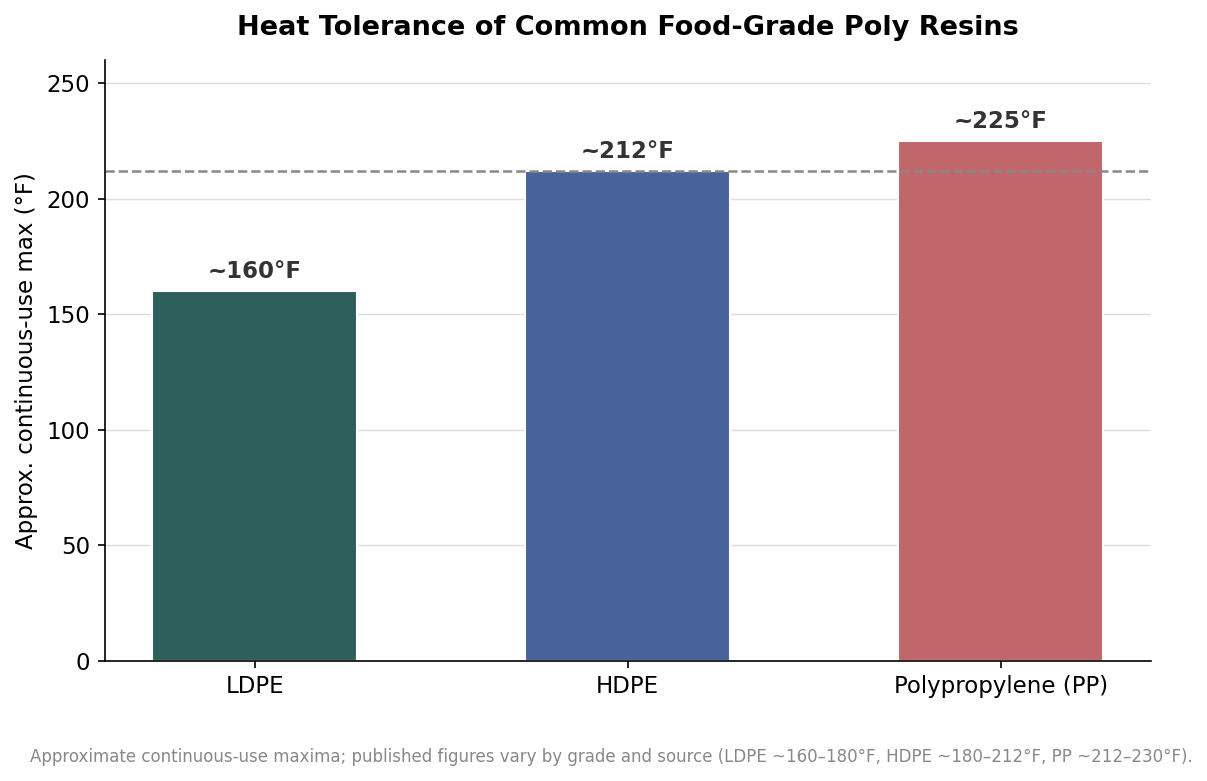
    Bar chart of approximate continuous-use maximum temperature by food-grade resin: LDPE about 160F, HDPE about 212F, polypropylene about 225F, with a boiling-water reference line
    When the process runs hot, the fix is a higher-temperature resin rather than a thicker LDPE bag.

    The paperwork that proves compliance

    Compliance you cannot document is compliance you cannot defend. Before you approve a print run, ask the supplier for a letter of guaranty or conformance stating that the film meets 21 CFR 177.1520, on their letterhead and tied to the material you are actually buying. Add a material or grade certificate confirming the resin and density, and lot traceability that links a heat or lot number back to that conformance statement, so a specific box of bags can be traced if a question ever arises. If your product touches potable water or falls under a specific program, request the relevant listing number rather than assuming a general food-grade letter covers it. Reputable converters produce these documents as a matter of routine; hesitation is a signal worth heeding.

    Printing without breaking food-grade status

    A custom-printed food bag adds one more variable: the ink. Inks and coatings are subject to the same migration logic as the resin, so the standard practice is to keep printing on the outer surface of the bag, away from the food, or to use inks formulated as low-migration for food packaging. Surface printing on the exterior sidesteps most direct-contact concerns; reverse or interior printing needs inks specifically cleared for that use. When you send artwork, tell the converter the bag is for food contact so they select the right ink system rather than a general-purpose one, and ask that the food-contact statement account for the printed film, not just the base resin.

    None of this makes food-grade bags exotic or expensive. It makes them specified. Name the resin, state the temperature range, insist on virgin material for direct contact, confirm any colorant and ink are food-cleared, and collect the conformance paperwork before production. Do that once, save the specification, and every reorder carries the same defensible compliance without you having to relitigate it.
  • Amazon FBA Poly Bag Requirements: A Seller’s Compliance Checklist

    Amazon FBA Poly Bag Requirements: A Seller’s Compliance Checklist

    A poly bag that fails Amazon’s inbound checks does not just get a warning. The unit can be refused at the fulfillment center, flagged as a prep defect, or hit with a per-unit repackaging fee, and the inventory sits unsellable until it is fixed. Most of these rejections trace back to a handful of measurable specifications, and every one of them can be verified before a shipment leaves your warehouse. This guide walks through what Amazon actually inspects on a poly-bagged unit and the numbers that keep a shipment moving.

    The five specifications Amazon checks

    When a poly-bagged unit arrives at a fulfillment center, staff and automated systems are effectively looking for five things: that the bag is sealed completely, that it is transparent enough to identify the contents, that the barcode is scannable through or on the bag, that the bag carries a suffocation warning when its opening is large enough to require one, and that the bag is not wildly oversized for the product inside. None of these are subjective. A bag either seals shut or it does not; a barcode either scans on the first pass or it does not. Treating them as a pass/fail checklist rather than a judgment call is the fastest way to bring your defect rate down.

    Thickness and transparency: the 1.5-mil floor

    Amazon’s baseline is a poly bag of at least 1.5 mil thickness, where a mil is one thousandth of an inch. That floor exists for a practical reason: thinner film tears during the tumble of conveyor belts and chutes, and a torn bag exposes the product and its barcode. For heavier or edged items, stepping up to 2 mil or 3 mil buys puncture resistance at a modest cost increase, typically a fraction of a cent per bag at volume. The bag also has to be see-through so that receiving staff can identify the unit without opening it. The main exception is adult products, which Amazon requires to ship in opaque, non-transparent bags. If you print heavily on a bag, keep a clear window over the barcode so it stays readable.

    When a suffocation warning is legally required

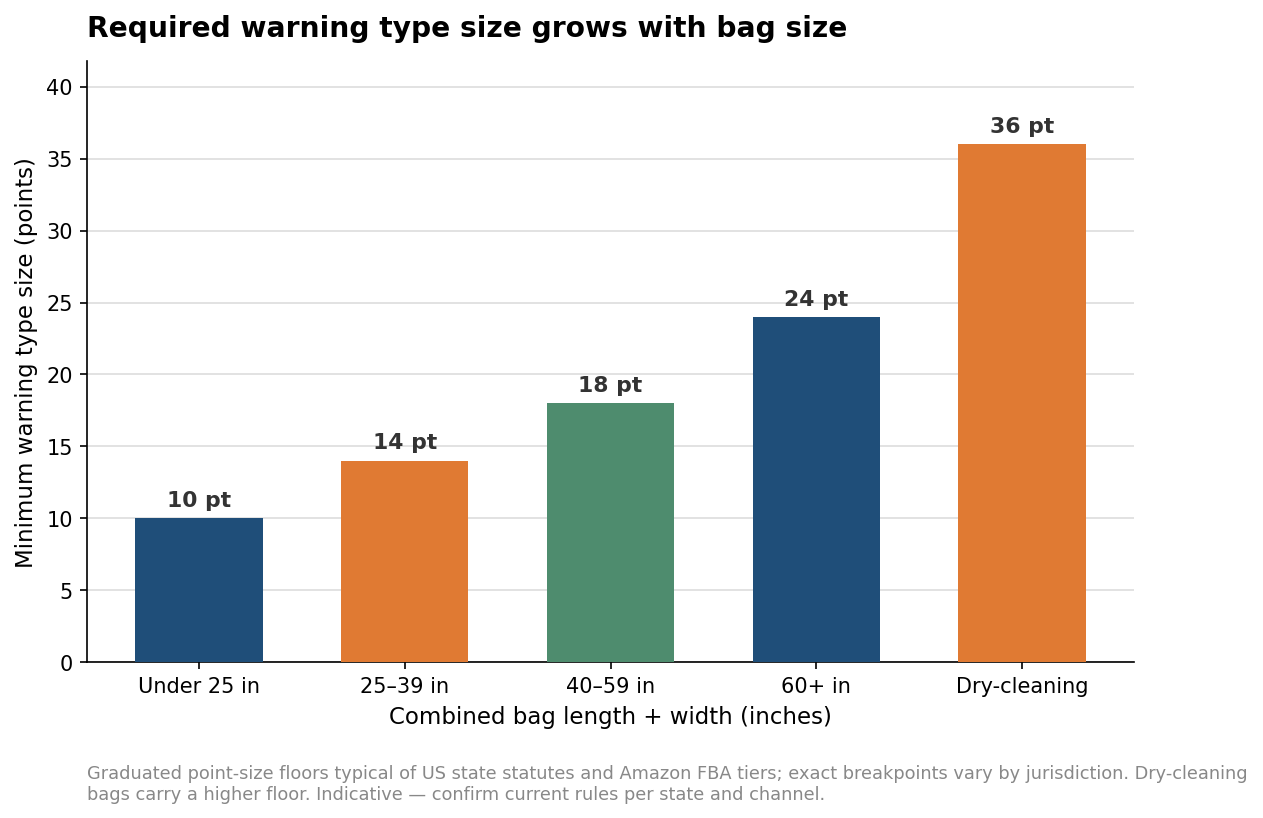
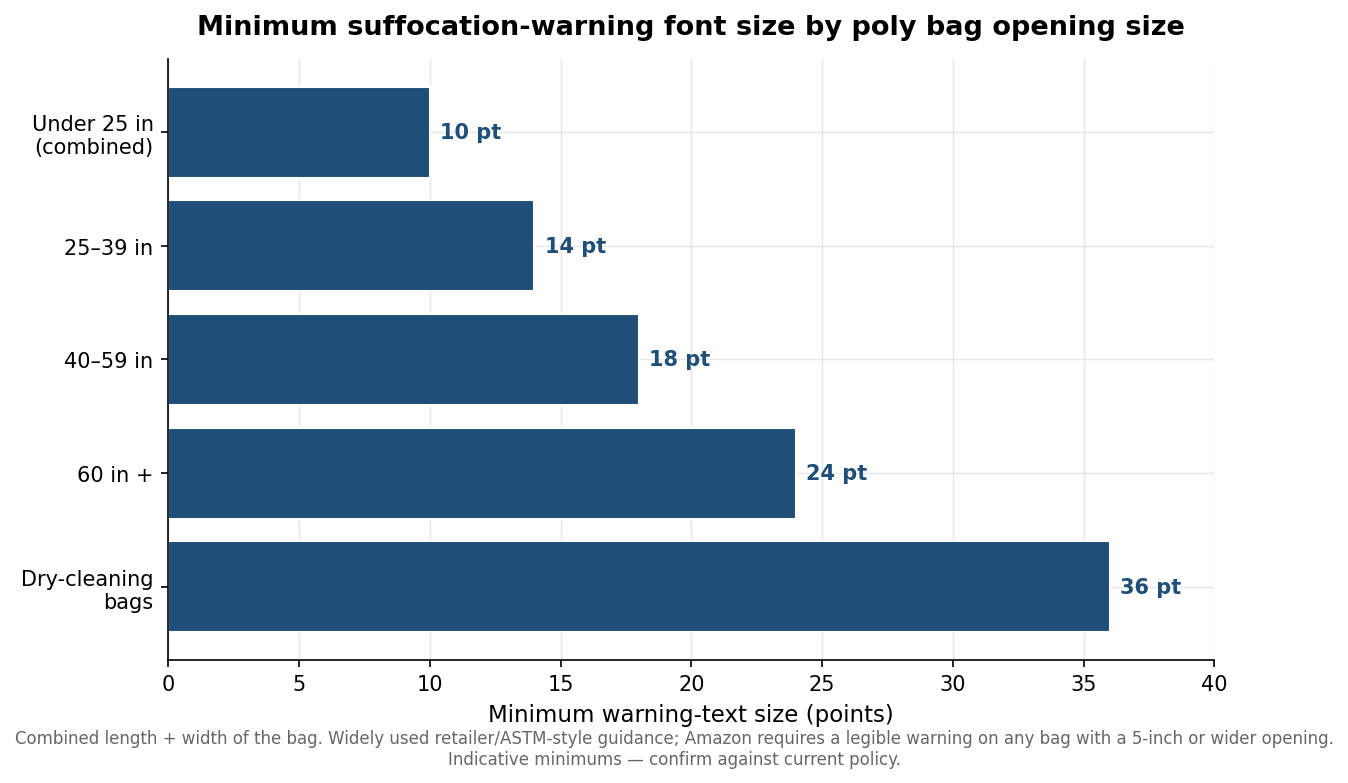
    Amazon requires a printed suffocation warning on any poly bag with an opening of 5 inches or wider measured flat. The warning has to be legible, which in practice means the font scales with the size of the bag. The widely used guidance ties the minimum text size to the combined length and width of the bag: roughly 10-point for small bags under 25 inches combined, 14-point in the 25-to-39-inch range, 18-point from 40 to 59 inches, and 24-point at 60 inches and above. Dry-cleaning-style bags, which pose the highest risk, are often held to a 36-point minimum. The exact wording is not fixed, but a compliant warning tells the reader to keep the bag away from babies and children, states the suffocation risk, and notes that the bag is not a toy.

    Bar chart of minimum suffocation-warning font size by poly bag combined dimension, from 10 point to 36 point
    Minimum warning-text size scales with bag size; dry-cleaning bags carry the strictest requirement.

    It is worth separating Amazon’s rule from state law, because they are not the same. Several states set their own thresholds for thin plastic bags, generally those at or under 1 mil. California requires a warning on bags with an opening wider than 25 inches or a capacity of 125 cubic inches or more, while Massachusetts, New York, and Chicago key their rules to openings of roughly 5 to 7 inches or combined dimensions of 25 inches. If you sell into multiple channels, the safe move is to print to the strictest standard that applies to your product rather than track each jurisdiction separately. Target, for example, asks for a 20-point minimum on all poly bags regardless of size.

    Sizing the bag: the three-inch slack rule

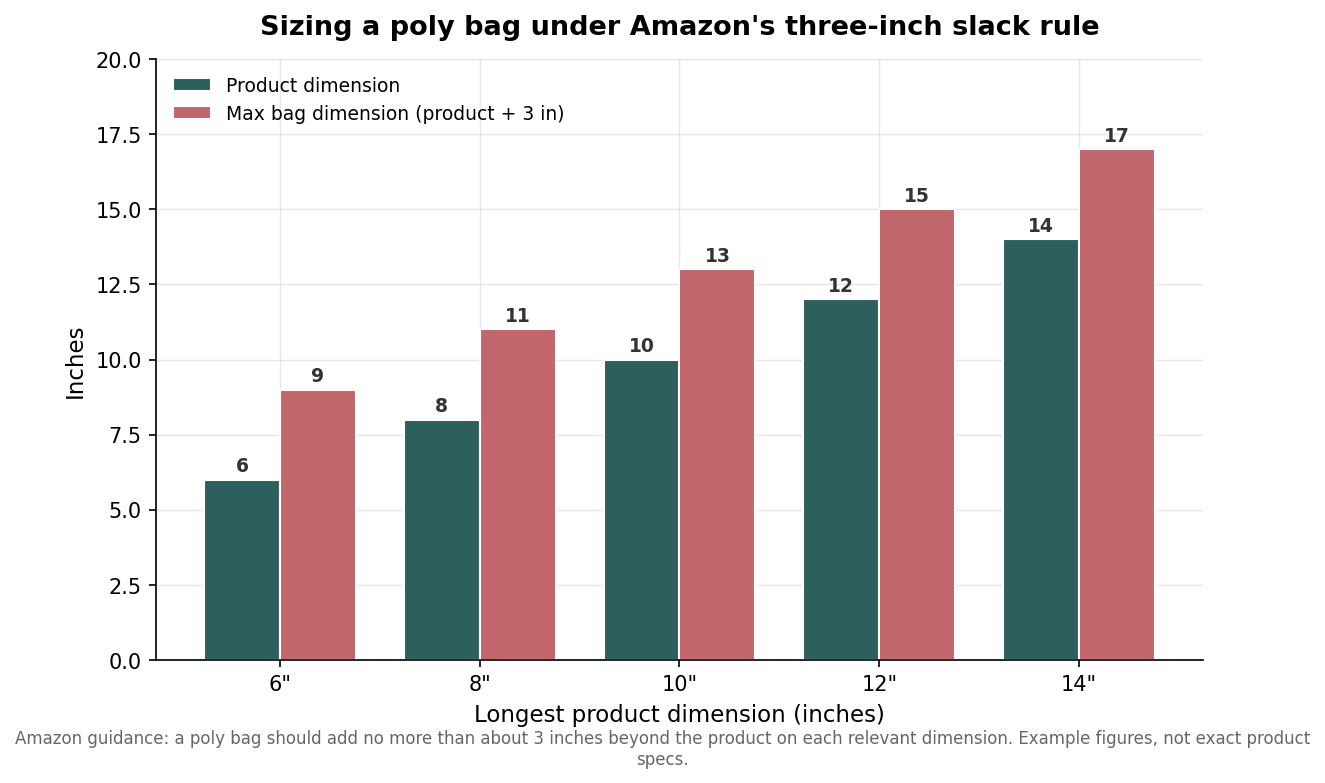
    Oversized bags are a common and avoidable rejection. Amazon’s guidance is that the bag should not add more than about 3 inches beyond the product on the relevant dimensions. A bag that swallows the product in loose film is harder to scan, harder to stack, and reads as sloppy prep. In practice this means measuring the longest dimension of your item and choosing a bag width and length that hug it with a few inches of tolerance for sealing, no more.

    Grouped bar chart comparing product dimension to maximum poly bag dimension under Amazon's three-inch slack rule
    Amazon’s slack rule caps the bag at roughly three inches beyond the product on each relevant dimension.

    The chart above shows the ceiling, not a target. A product with a 10-inch dimension can sit in a bag up to about 13 inches on that axis, but a 12-inch bag is usually the cleaner choice. When you are ordering custom bags in a fixed size, pick the stock size that lands just above your product’s footprint plus a small seal allowance. If your catalog spans a range of sizes, it is often cheaper to standardize on two or three bag sizes than to chase a perfect fit for every SKU, provided each product still falls within the slack limit.

    Sealing, barcodes, and the final walk-through

    The bag has to be sealed completely, with no open end. A heat sealer gives the cleanest result, but a permanent adhesive lip strip is acceptable and is standard on most e-commerce mailers and self-seal bags. The unit’s barcode, whether an FNSKU label or a scannable manufacturer barcode, must be visible and flat enough to read without the operator fishing the product out of the bag. Wrinkles and folds over the barcode are a frequent cause of scan failures, so position the label on a flat face and smooth the film before sealing.

    Before a shipment goes out, a quick pass against the same five checks Amazon uses will catch almost every problem: sealed, transparent, scannable, warned, and correctly sized. The specifications here are current retailer guidance and indicative minimums rather than a substitute for Amazon’s own published policy, which can change, so confirm the details in Seller Central before a large run. Getting the bag right is inexpensive insurance against fees and held inventory, and it is entirely within your control at the packing bench.

  • Poly Mailer vs. Bubble Mailer: A Product-by-Product Guide to Choosing the Right One

    Poly Mailer vs. Bubble Mailer: A Product-by-Product Guide to Choosing the Right One

    The choice between a poly mailer and a bubble mailer is not really a question of which is better. It is a question of which one matches the product going inside it. Pick the wrong one and you either pay for cushioning you did not need on every order for a year, or you save a few cents a unit and eat a stream of damage claims. The right call is specific to what you ship, and once you see the cost and protection trade-offs in real numbers, it is usually obvious.

    This guide walks through what each mailer actually does, what the gap between them costs, why weight is a shipping expense and not just a spec, and finally which format fits which kind of product.

    What each mailer is actually built to do

    A poly mailer is a thin, flexible plastic envelope, typically a co-extruded polyethylene film. Its job is to keep contents dry and contained and to resist tearing in the mail stream. What it does not do is cushion. There is no air, no padding, nothing between the film and the product, so any impact passes straight through. That is exactly why it works so well for soft goods that cannot really be damaged by a bump.

    A bubble mailer is a paper or poly envelope lined with a layer of air-bubble cushioning. It adds impact and scratch protection, wrapping the product in a thin shock-absorbing layer. That protection is the whole point, and it is also the source of its two downsides: it weighs more and costs more, because you are paying to ship air around every item whether that item needs it or not.

    The distinction is protection, not quality. Neither is the premium option; they solve different problems. A poly mailer is not a cheap bubble mailer, and a bubble mailer is not an upgraded poly mailer. They are two tools, and the product tells you which one you are holding the job for.

    The cost gap is wider than the sticker price

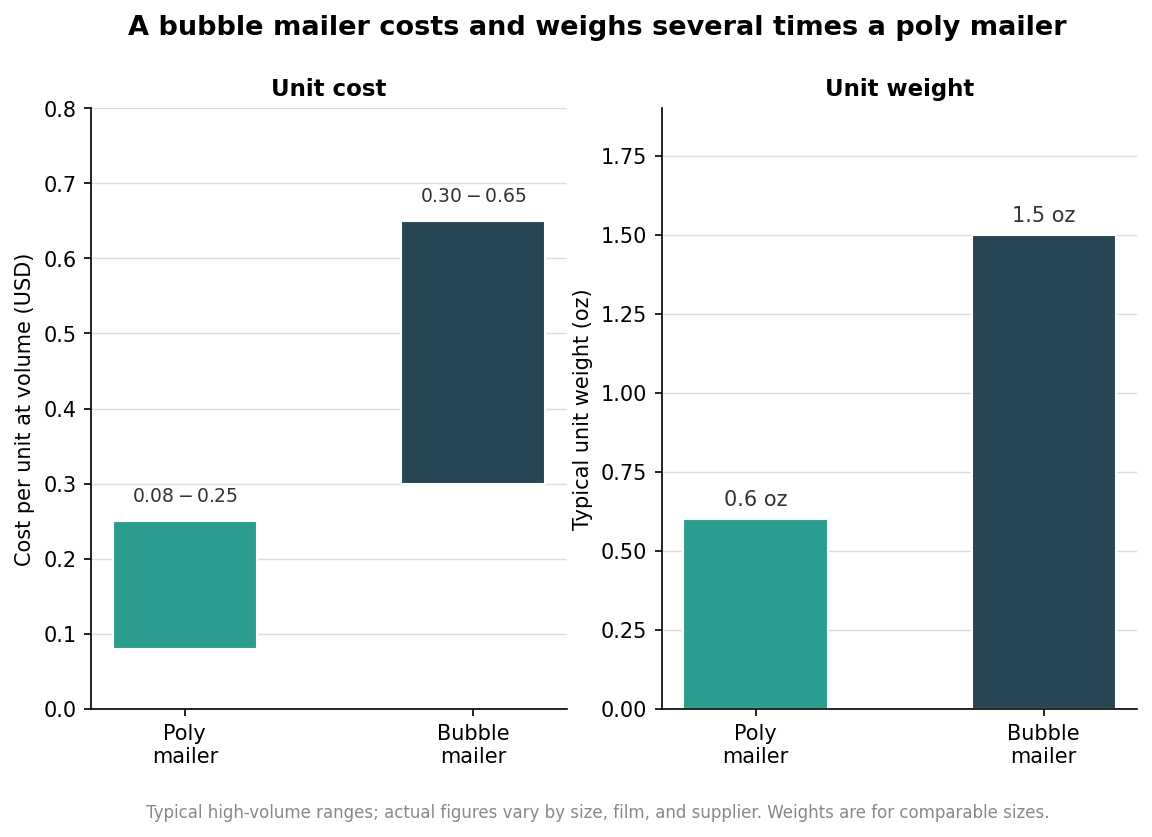
    At volume, a poly mailer commonly runs about 8 to 25 cents a unit, while a comparable bubble mailer lands around 30 to 65 cents. On a single order that difference is trivial. Across thousands of shipments a month it is a real line on your packaging budget, and it compounds with a second, quieter cost that never shows up as its own invoice item: weight.

    Two-panel bar chart comparing poly mailer and bubble mailer on cost per unit at volume and typical unit weight in ounces
    A bubble mailer typically costs and weighs several times what a comparable poly mailer does.

    A poly mailer weighs well under an ounce, roughly 0.6 ounces in common sizes. A bubble mailer of similar size weighs around one and a half times to three times as much. That extra ounce or two matters because carriers bill in rounded-up weight steps, and a package that would have squeaked under a threshold can tip into the next one. An added ounce near a postage break can cost on the order of 40 cents per package. Ship 300 of those a month with even half affected and you are looking at roughly 60 dollars a month, or 700 dollars a year, in surcharges you never see itemized.

    Weight is a shipping cost, not just a spec

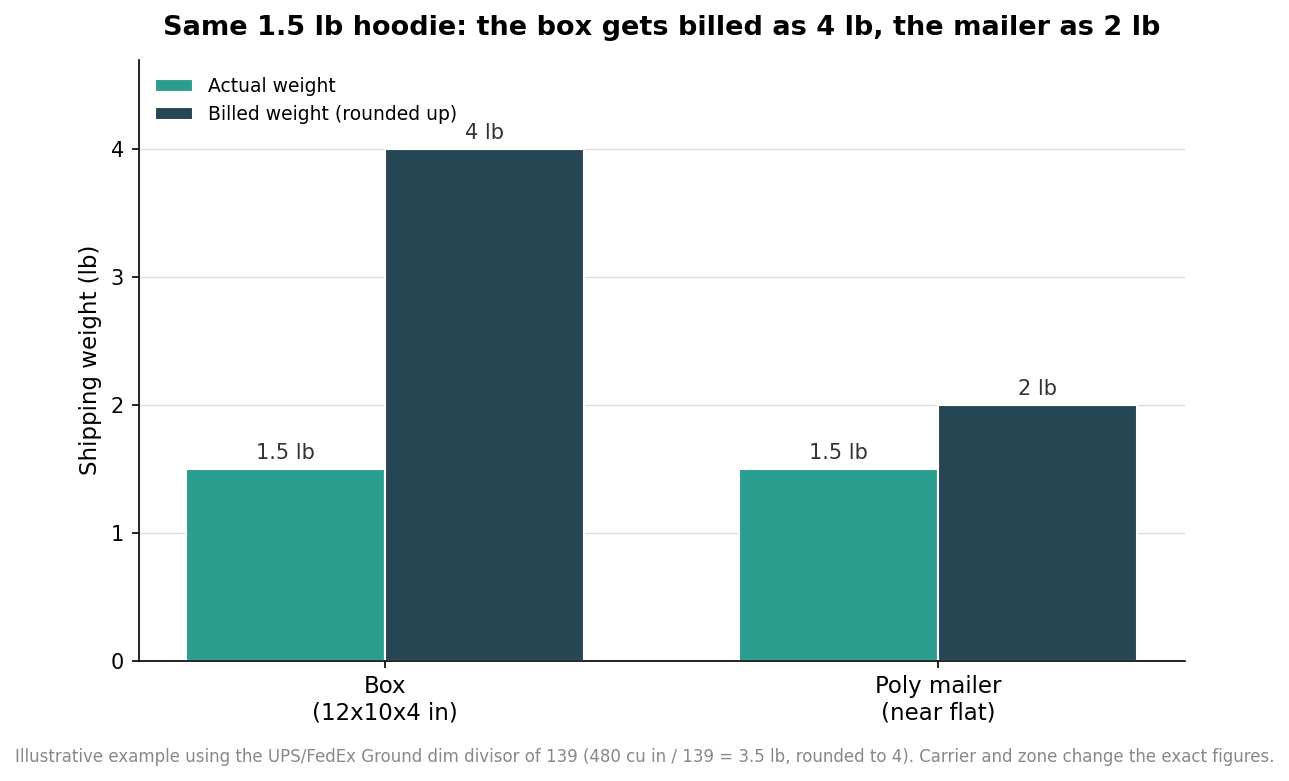
    The bigger shipping lever is dimensional weight, and this is where mailers of either kind beat boxes decisively. Carriers charge on the greater of a package’s actual weight and its dimensional weight, which is its volume divided by a fixed divisor, 139 for UPS and FedEx Ground and around 166 for USPS. A box is a rigid volume; a mailer collapses to nearly flat around its contents. That difference reprices the same product.

    Take a folded hoodie that actually weighs about a pound and a half. In a 12 by 10 by 4 inch box, its 480 cubic inches divided by 139 come out to 3.5 pounds of dimensional weight, billed as 4. Slip the same hoodie into a flat poly mailer and there is almost no volume to speak of, so it bills on its actual weight, rounded to around 2 pounds. Same garment, half the billed weight, and that gap repeats on every parcel.

    Grouped bar chart comparing actual versus billed shipping weight for a 1.5 pound hoodie in a box versus a flat poly mailer
    Because carriers bill on dimensional weight, a flat mailer can halve the billed weight of the same product versus a box.

    This is the real reason poly mailers dominate soft-goods shipping. The unit-cost savings are nice, but the shipping savings are the prize, and they accrue automatically on every order without any negotiation with the carrier.

    A product-by-product selection guide

    Reach for a poly mailer when the product is soft, flat, or unbreakable: apparel and textiles, soft accessories, books, printed matter, and most cut-and-sew goods. These items shrug off the handling a poly mailer does not cushion, so you are paying only for containment and moisture resistance, which is all they need. Poly mailers also have the recycling edge, since the thin film is accepted at store drop-off points, whereas most curbside programs will not take them at the bin.

    Reach for a bubble mailer when the product is small but semi-fragile: cosmetics and glass vials, jewelry, small electronics and their accessories, hardware, and anything with corners or a screen that a drop could crack. Here the cushioning is not overhead; it is the thing preventing a return. The extra weight and cost buy down your damage rate, and for these items that trade is worth making. The recycling picture is worse, because the mixed paper-and-plastic construction is hard to process, so if sustainability messaging matters to your brand, weigh that alongside the protection.

    A useful test is to ask what failure looks like for your specific item. If the worst a rough transit can do is wrinkle the product, a poly mailer is right. If the worst it can do is crack, scratch, or shatter it, pay for the bubble.

    When neither mailer is the answer

    Mailers win on cost and dimensional weight, but they are not universal. A box earns its keep when the product is genuinely fragile, when it is heavy enough to strain and burst a mailer’s seams, when an order combines several items that need rigidity to travel together, or when the unboxing experience is part of the brand and a flexible envelope would undercut it. Long, multi-facility routes with heavy sortation also favor the structure of a box for anything remotely breakable.

    For most e-commerce catalogs, though, the honest answer is that a large share of orders are soft goods that have been shipping in far more packaging than they require. Sorting your catalog into the three buckets, poly mailer for the unbreakable, bubble mailer for the small and semi-fragile, and box for the genuinely fragile or rigid, is a one-afternoon exercise that quietly lowers both your packaging spend and your postage on every order that follows. Treat the figures here as current typical ranges rather than fixed quotes, confirm the dimensional-weight math against your own carrier and zones, and let the product, not habit, choose the mailer.

  • Flat, Gusseted, or Wicketed: Choosing the Right Poly Bag Style

    Flat, Gusseted, or Wicketed: Choosing the Right Poly Bag Style

    Film type and thickness get most of the attention when people order poly bags, but the bag’s construction style is a separate decision that often matters more for how well the packaging actually works. A bag’s shape determines whether a bulky item fits, whether the seam holds under weight, and whether a packing line can run at speed. Get the style right and everything downstream gets easier; get it wrong and you are fighting the bag on every order.

    Flat bags: the sensible default

    A flat, or layflat, bag is exactly what it sounds like, a simple two-panel bag with no expansion. It lies flat, stores in less space, costs the least film for a given face size, and shows off a printed logo cleanly because the front stays smooth. For flat or lightweight products, apparel, printed materials, manufacturing components, and general everyday packaging, it is usually all you need. The limitation is depth. A layflat bag has almost no room for a three-dimensional item, so anything bulky either will not fit or stretches the film until the print distorts and the seam is stressed. If the item is essentially flat, choose a flat bag and move on.

    Gusseted bags: when depth changes the math

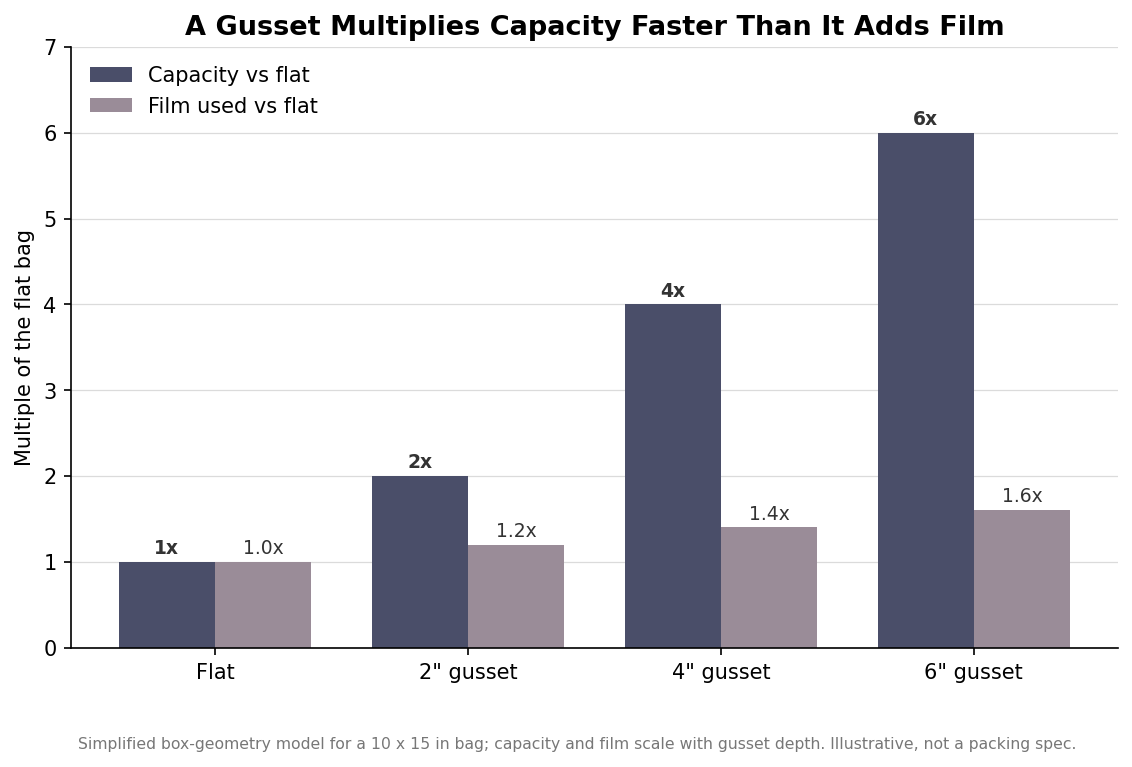
    A gusset is a folded pleat, on the sides or the bottom, that expands when the bag is filled. That fold is what lets a bag hold a boxy or irregular item without deforming, and it is why gusseted bags are the standard for coffee, nuts, baked goods, bulk hardware, and anything that needs to stand up or hold its shape. The reason a gusset is worth the small upcharge is geometry: adding depth multiplies capacity far faster than it adds material. In a simplified model of a ten-by-fifteen-inch bag, moving from flat to a four-inch gusset roughly quadruples the packed volume while using only about forty percent more film.

    Grouped bar chart showing that adding a gusset multiplies a poly bag's capacity much faster than it increases the amount of film used
    For a 10 by 15 inch bag, a deeper gusset multiplies capacity far faster than it adds film.

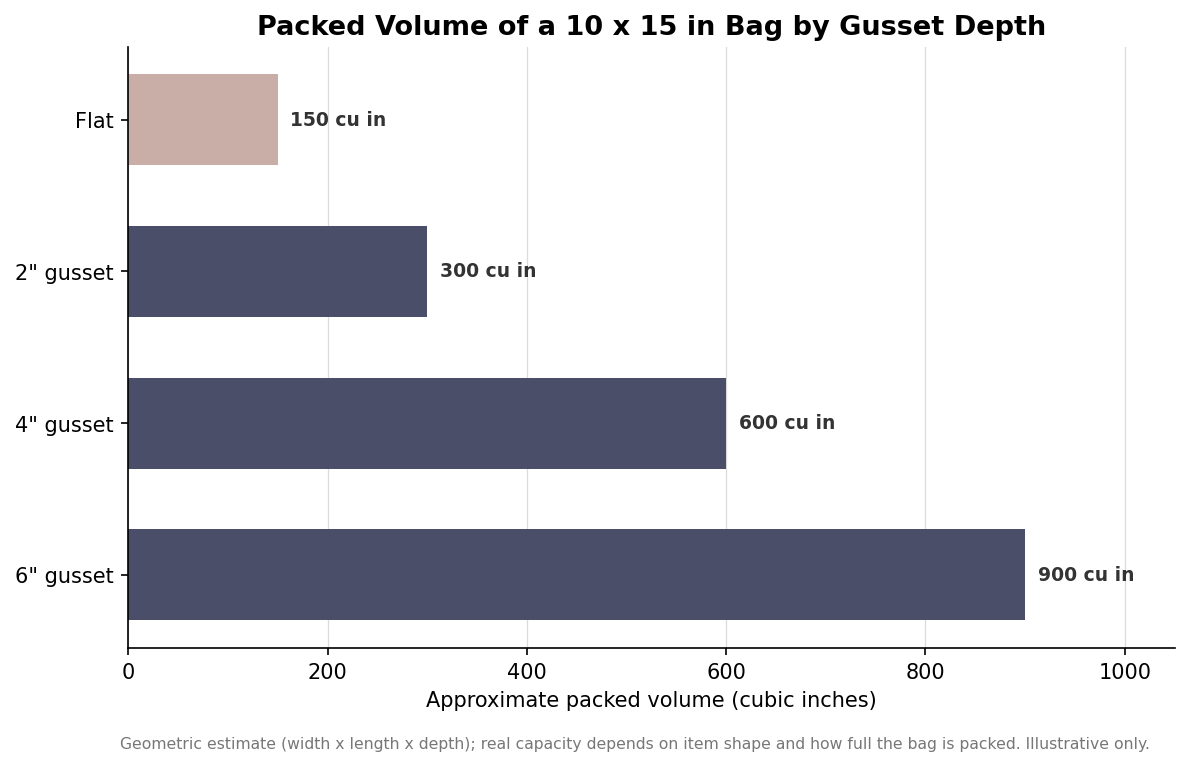
    Put in absolute terms, that same bag holds only a sliver of volume when flat but hundreds of cubic inches once a gusset opens it into a box shape. The practical takeaway is to measure your item in three dimensions before ordering, then pick a gusset deep enough to swallow the thickness without the bag straining. A gusset that is too shallow leaves you back at the flat-bag problem; one that is far too deep wastes film and leaves loose material flapping around the product.

    Horizontal bar chart of approximate packed volume for a 10 by 15 inch poly bag at flat, 2-inch, 4-inch, and 6-inch gusset depths
    Packed volume rises steeply with gusset depth, which is why boxy items need a gusseted style.

    When you specify a gusseted bag, give the supplier the item’s width, depth, and height, not just a bag size, so they can translate it into the correct face and gusset dimensions. A small sample order to confirm the fit is cheap insurance before committing to a full run.

    Bottom-seal versus side-seal

    Where the seam sits is a strength decision that is easy to overlook. A bottom-seal bag carries a single seal across the base, which puts the strongest part of the bag directly under the weight of the contents, making it the better pick for heavier or denser items. A side-seal bag has seals running up both sides, which produces a very clean face for printing and works well for lighter goods, but the side seams can be a weaker point if the bag is loaded heavily. As a rough rule, lean bottom-seal for weight and durability and side-seal for appearance and lighter contents, and tell your supplier what the bag will actually carry so they can recommend the seam that will not split in transit.

    Wicketed bags: built for speed

    If bags are being filled by hand one at a time, style is mostly about the product. The moment volume rises, the loading method becomes the constraint, and that is where wicketed bags earn their place. A wicket is a set of metal or plastic pins that hold a stack of bags together through holes punched in a header, keeping every bag aligned and letting an operator, or a machine, grab and open them one after another without fumbling for the opening. Wicketed bags are standard in bakery and food lines, apparel fulfillment, and parts kitting precisely because they feed cleanly.

    Their real advantage shows up with automation. On an automated bagging system, wicketed bags can be opened, filled, and sealed in a continuous cycle rather than handled individually, which is why high-throughput packing operations standardize on them. If you are still hand-packing but expect volume to grow, choosing a wicketed style now makes a later move to a semi-automated or automated bagger far less disruptive, since the bag format is already compatible.

    How to spec the style

    Work through four questions in order. First, measure the item in three dimensions and decide whether it is flat enough for a layflat bag or needs a gusset. Second, weigh the loaded bag and choose bottom-seal for heavier contents or side-seal for lighter, print-forward packaging. Third, decide how bags will be loaded now and in the near future, and specify wicketed headers if speed or automation is on the horizon. Fourth, only then settle film and thickness, because the right style with the wrong gauge still fails. Confirm the final combination with a small sample against your actual product before you place the bulk order, and treat the capacity figures here as geometric illustrations rather than a packing guarantee for your specific item.

    One last point worth flagging: bag style also affects how a barcode or shipping label scans. Flat and side-seal bags give a smooth, wrinkle-free face that reads reliably at the register or on a conveyor, while a heavily filled gusseted bag can pull the surface taut or uneven, so leave a flat panel for the label or plan to apply it to a stiffer area. Thinking about the label surface at the same time as the style saves a surprising number of rescans down the line.

  • LDPE vs. LLDPE vs. HDPE: A Poly Bag Materials Guide

    LDPE vs. LLDPE vs. HDPE: A Poly Bag Materials Guide

    Two poly bags can share the same 2 mil thickness and behave nothing alike. One is glossy and soft and drapes around a folded shirt; the other is stiff, slightly hazy, and crackles when you handle it. The difference is not the gauge on the spec sheet but the resin the film is made from. Poly bags are almost always one of three polyethylenes: LDPE, LLDPE, or HDPE. Knowing how they differ is the fastest way to stop guessing at thickness and start choosing a bag that actually suits what you put in it and how you want it to look with your logo on it.

    Three polyethylenes and why they behave differently

    All three resins are polyethylene, but their molecules are packed differently, and that packing sets nearly every property that matters. LDPE (low-density polyethylene) has a branched molecular structure that keeps the film flexible, clear, and easy to process, at the cost of comparatively low strength. HDPE (high-density polyethylene) has a tightly packed, minimally branched structure that makes it rigid, strong, and stiff, with a characteristic matte, crinkly feel. LLDPE (linear low-density polyethylene) sits between them: its short, uniform branches let the film stretch and slide under stress instead of tearing, which gives it excellent puncture and tear resistance.

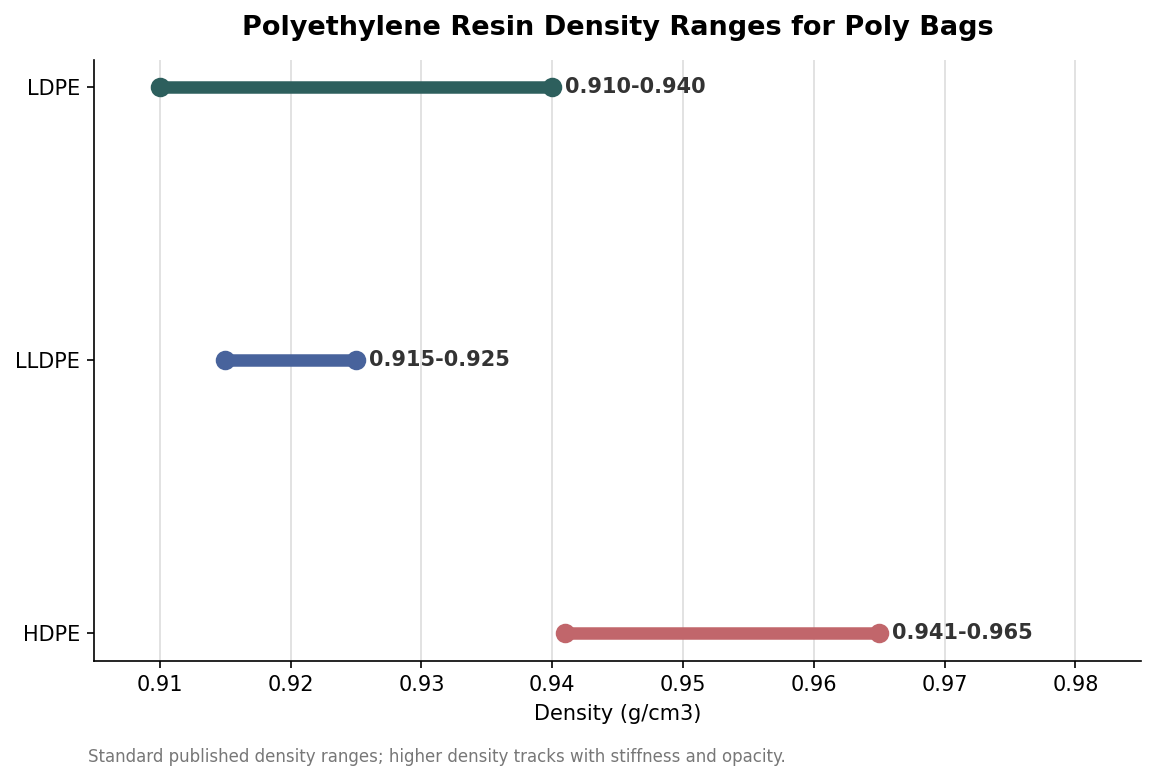
    Density is the shorthand for all of this. LDPE runs roughly 0.910 to 0.940 grams per cubic centimeter, LLDPE a narrow 0.915 to 0.925, and HDPE a denser 0.941 to 0.965. Higher density tracks with stiffness and opacity; lower density tracks with softness and clarity. When a supplier quotes you a resin, that single number tells you most of what the bag will feel like before you ever hold a sample.

    Range plot of LDPE, LLDPE and HDPE polyethylene density in grams per cubic centimeter
    Density is the shorthand: lower means softer and clearer, higher means stiffer and more opaque.

    Clarity and print: how the resin changes how your logo looks

    For a branded bag, appearance is not a side issue, and here the resins genuinely diverge. LDPE is the clearest and glossiest of the three, which is why retail bags meant to show the product inside are usually LDPE. Its smooth surface also takes flexographic printing cleanly, so solid color fields and fine logo detail land crisply. HDPE is the opposite: it is hazier and often opaque with a matte finish, so a printed logo reads with a flatter, more utilitarian look, and you generally cannot show the product through it. LLDPE falls in the middle, with moderate clarity that works for many mailers and industrial bags where a showroom-clear window is not the point.

    If your goal is a bag a customer sees on a shelf or opens at their door as part of the unboxing, LDPE or an LDPE-rich blend is usually the right starting point. If the bag is protective packaging that lives inside a carton, the matte, tougher look of HDPE or the resilience of LLDPE matters more than gloss, and you can spend your budget on strength instead of clarity.

    Strength, puncture, and stretch: matching resin to the contents

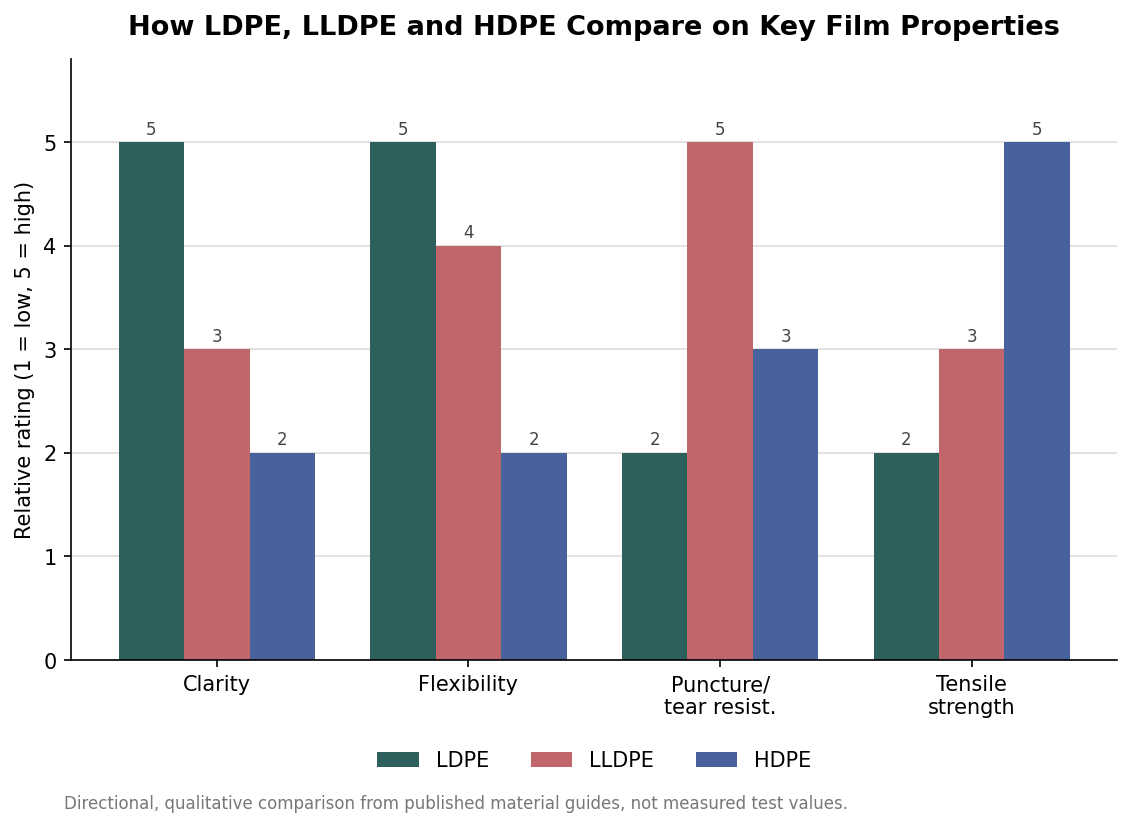
    Strength is not one property but three, and each resin wins a different one. HDPE has the highest tensile strength, so it resists being pulled apart and holds dense, heavy contents like hardware or bulk grains without stretching out of shape. LLDPE has the best puncture and tear resistance, because its molecular structure lets the film deform around a sharp corner rather than splitting; that makes it the usual choice for anything with edges, or for bags that get handled roughly in shipping. LDPE trails both on raw strength but leads on flexibility and clarity, which is exactly what lighter-duty retail and apparel packaging wants.

    The practical read is to start from the failure you are trying to avoid. If bags are bursting at the seams under weight, tensile strength is your problem and HDPE or a thicker gauge helps. If they are getting punctured by product corners, LLDPE content is the fix, often more effective than simply adding thickness. If the bag looks cheap or cloudy next to your product, you have overspent on strength and want more LDPE. Adding mils is the blunt instrument; changing or blending resin is the precise one.

    Grouped bar chart comparing LDPE, LLDPE and HDPE on clarity, flexibility, puncture resistance and tensile strength
    Each resin wins a different property, so the right choice depends on what the bag must survive.

    Blends, thickness, and choosing a spec you can reorder

    In practice most poly bags are not a single pure resin but a blend engineered to balance these traits, commonly LLDPE mixed into LDPE to add toughness without giving up much clarity. That is why you should treat resin and thickness as two separate dials rather than one. Thickness, measured in mils, controls how much material is there; resin controls how that material behaves. A 2 mil LLDPE-rich bag can outperform a 3 mil pure LDPE bag on puncture resistance while using less plastic, which matters for both cost and weight.

    When you find a bag that works, write down the full specification, not just the dimensions and mil. Record the resin or blend, the thickness, the finish (clear versus matte), the seal type, and the print details, because a reorder that matches only the size and gauge can still come back looking and feeling different if the resin changes. Ask for a physical sample before a first production run and keep one on file as your reference. Lead times for printed poly bags commonly run one to a few weeks depending on quantity, print complexity, and season, and that figure is indicative rather than a promise, so build a little schedule buffer into any packaging you cannot afford to run out of. Getting the resin right the first time is what makes every reorder after it boringly consistent, which is exactly what you want from packaging.

  • Poly Bags With Suffocation Warnings: When You Legally Need Them

    Poly Bags With Suffocation Warnings: When You Legally Need Them

    If you ship products in printed poly bags, the suffocation warning is not a design afterthought. For many sellers it is the line between a shipment that clears and one a marketplace rejects at the dock. Five states write the requirement into law, and the largest online marketplaces enforce their own versions on top of that. The rules are not complicated, but they are specific about three things: which bags are covered, what the warning has to say, and how large the type must be.

    Which bags are legally required to carry a warning

    Five US states have suffocation-warning statutes on the books: California, New York, Massachusetts, Virginia, and Rhode Island. Each targets thin plastic film, the kind light enough to cling to a child’s nose and mouth. The common trigger is thickness, and the statutes generally apply to bags measuring less than one mil, or 0.001 inch, the range where film is flimsy enough to seal against skin. A bag printed at 1.5 or 2 mil sits above that statutory floor, but that does not make the warning optional, because the platforms you sell through set their own rules regardless of gauge.

    There is no federal law mandating the exact wording, which is why the five states differ in their language. If you sell into more than one of them, and any national e-commerce brand does, the practical answer is to carry a warning that satisfies the strictest state rather than printing a different bag for each jurisdiction. One compliant panel on every unit is cheaper and far easier to manage than a patchwork.

    What the warning actually has to say

    The states do not share a single mandated sentence, but they converge on the same elements: the word WARNING or CAUTION, a statement that the bag poses a suffocation danger, an instruction to keep it away from babies and children, and in most versions a line about not using it in cribs, beds, carriages, or playpens. New York and Massachusetts use nearly identical phrasing. California’s older statute reads, in part, “CAUTION – KEEP AWAY FROM SMALL CHILDREN. THE THIN FILM MAY CLING TO NOSE AND MOUTH AND PREVENT BREATHING.”

    A widely used general-purpose block that covers the common requirements reads: “Warning: To avoid danger of suffocation, keep this plastic bag away from babies and children. Do not use this bag in cribs, beds, carriages, or playpens. This bag is not a toy.” Because the exact statutory language varies, treat that as a sensible default rather than a legally certified one, and confirm the current wording for any specific state that concerns you.

    How large the type has to be

    This is where most sellers get tripped up. The warning is not enough on its own. It has to be legible at a size the rules tie to the bag’s dimensions, and the measure used is the sum of the bag’s length and width. The minimum type size steps up as the bag gets bigger.

    Bar chart of minimum suffocation warning type size, from 10 points for bags under 25 inches to 36 points for dry-cleaning bags
    Minimum warning type size scales with the combined length and width of the bag.

    For a typical small mailer or apparel bag under 25 inches combined, a 10-point minimum is the common floor. A large garment or furniture bag crossing 60 inches combined can require 24-point type, and dry-cleaning bags, historically the highest-risk category, often carry a 36-point requirement. The exact breakpoints shift a little from statute to statute, so treat the tiers above as a working guide rather than one universal table. When a bag sits near a boundary, size the type up rather than down; the cost of oversizing a warning is nothing, and the cost of undersizing it is a rejected lot.

    Marketplace rules go further than the law

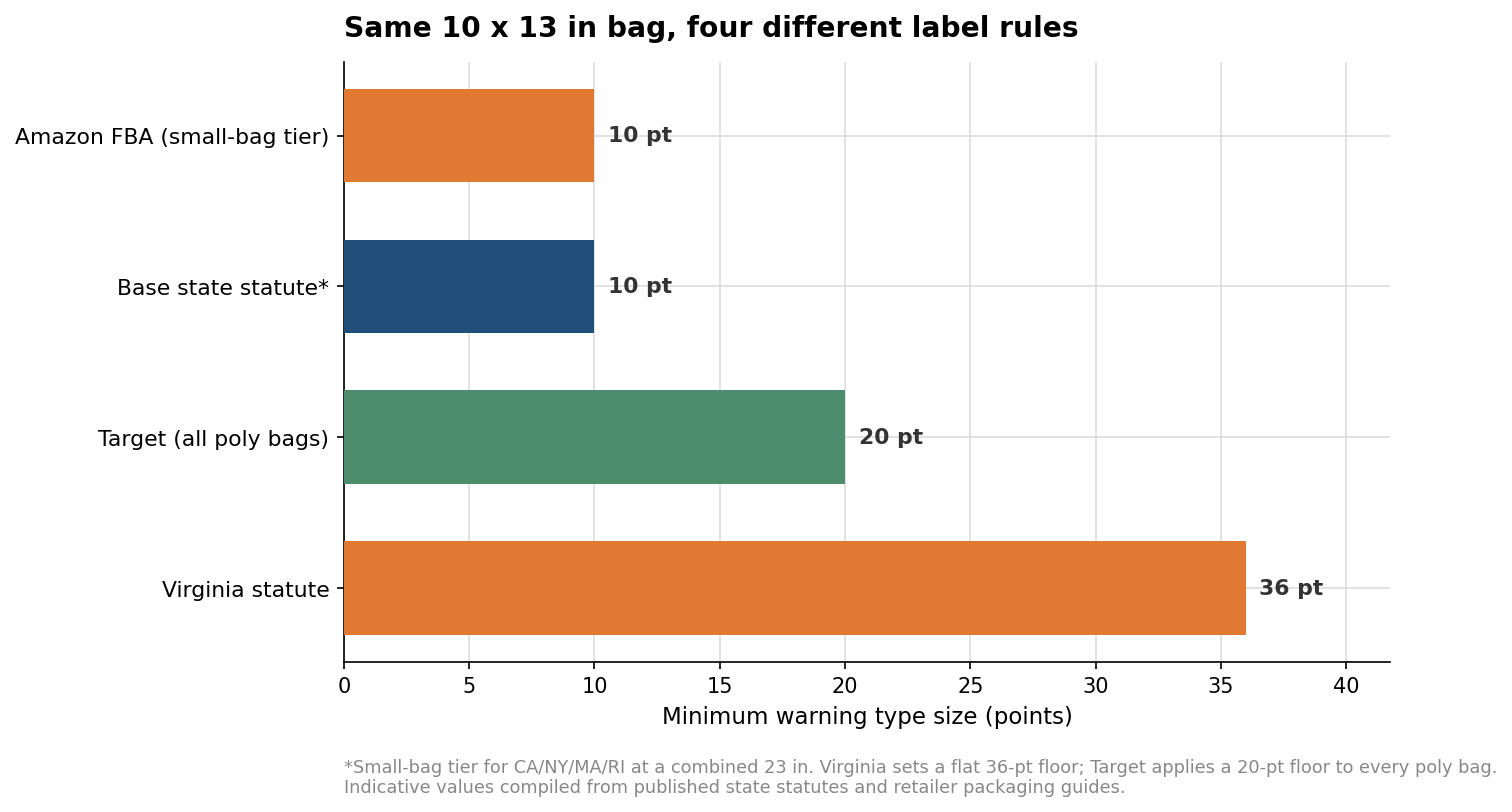
    Even when your bag is thick enough to sit outside the state statutes, the channel you sell on likely has its own requirement. Amazon is the one most sellers meet first. Its FBA guidelines call for poly bags of at least 1.5 mil and require a suffocation warning on any bag with an opening of five inches or larger, using the same graduated 10-to-24-point type scale. Target is stricter on type size, applying a 20-point minimum to every poly bag regardless of dimension. Walmart mirrors the state approach, focusing on bags one mil or thinner with five-inch-plus openings. Marketplaces such as eBay and Etsy publish no specific spec and leave the liability with the seller.

    The upshot is that a single bag can face four different labeling standards at once, and the one that governs your print file is whichever is strictest among the channels and states you actually touch.

    Horizontal bar chart comparing required warning type size for a 10 by 13 inch bag across Amazon, state statutes, Target, and Virginia
    One 10 x 13 inch bag can face four different type-size floors depending on where and how it sells.

    Read the chart the practical way: design to the highest bar you are exposed to. A brand selling a standard 10-by-13 bag nationwide through Amazon and Target should print to Target’s 20-point floor, because meeting it automatically clears Amazon’s small-bag tier and the base state statutes at the same time. You end up managing one artwork file instead of chasing exceptions channel by channel.

    Getting the warning onto your custom bags

    On a custom-printed poly bag the warning is usually printed directly into the film alongside your logo and artwork, which is cleaner and cheaper at volume than applying a separate sticker to every unit. Placement matters less than legibility. A common approach is to run the warning on the back panel or on the lip near the seal, where it stays plainly visible without competing with the brand-facing design. If you are ordering a run that will ship into regulated states or onto Amazon, specify the warning, its wording, and the required point size in your artwork brief up front, and ask the printer to confirm the rendered type size on the proof. Point sizes that look fine on screen can fall below the minimum once the file is scaled to the finished bag.

    Adding the warning is generally negligible on a printed run because it is just one more element in the same print pass. The real cost is getting it wrong: a rejected FBA shipment or a stop-sale order is far more expensive than a corrected plate. Build the warning into the first version of the artwork, size it to the strictest standard you sell under, and it stops being something you have to reconsider on every reorder.

  • A Retailer’s Guide to Poly Bag Margins — Customized Poly Bags

    Call or Text us: (929) 605-4397

    HomeBlog › A Retailer’s Guide to Poly Bag Margins

    Retail

    A Retailer’s Guide to Poly Bag Margins

    06/30/2026

    Packaging is a line item that’s easy to underprice, especially for retailers used to thinking of poly bags as a disposable cost rather than a branded asset. Here’s how to think about landed cost, price points, and volume tiers when a custom poly bag program is part of your retail or wholesale operation.

    The math is simpler than it looks once you separate cost from perceived value.

    Landed cost basics

    Per-unit pricing on custom poly bags runs roughly $0.06 to $0.20 depending on quantity, mil thickness, and decoration — and that cost drops meaningfully as order volume increases. At 500 units you’re paying toward the top of that range; by 5,000 to 10,000 units, per-unit cost is typically 30–50% lower.

    Where the margin actually comes from

    A branded poly bag isn’t a cost center on its own — it’s part of what lets a retailer justify a slightly higher shelf price versus an unbranded competitor, and it reduces returns by keeping product protected and presentable through handling. Factor packaging into your landed cost per unit, not as a separate overhead line, and the math holds up.

    Volume tiers to plan around

    Order volumeTypical per-unit rangeBest fit
    500–1,000Higher end of rangeNew SKU test, single style
    2,500–5,000Mid-rangeEstablished SKU, seasonal reorder
    10,000+Lowest per-unitCore SKU, full retail rollout
    Key takeawayTreat packaging cost as part of landed cost per unit, not overhead — and plan reorders at higher volume tiers as a SKU proves out, since per-unit pricing improves meaningfully at scale.

    Want a volume-tiered quote for your line? Get a custom quote — free mockups in 24–48 hours. Learn more about how we work, or browse more guides.

    More posts

  • How to Order Custom Poly Bags: A Step-by-Step Checklist — Customized Poly Bags

    Call or Text us: (929) 605-4397

    HomeBlog › How to Order Custom Poly Bags: A Step-by-Step Checklist

    Ordering

    How to Order Custom Poly Bags: A Step-by-Step Checklist

    06/01/2026

    First-time custom packaging orders go smoother when you walk in with a few answers ready. This checklist covers what we actually need from you to turn a quote request into a mockup within one business day.

    Work through it before you request your quote and the whole process moves faster.

    1. Artwork

    Vector files (AI, EPS, SVG, or PDF) are ideal. No logo file? Send a photo, a PNG, or even a rough sketch — our designers will recreate it print-ready at no charge.

    2. Bag style and size

    Know roughly what your product measures folded or boxed. If you’re between two sizes or two styles, send both — we’ll recommend a fit based on what similar brands order.

    3. Mil thickness

    Light goods do fine at 1.5 mil; general apparel and e-commerce usually land at 2 mil; anything heavy, sharp-edged, or freight-handled should go 3 mil. Not sure? Default to 2 mil and we’ll adjust on the mockup call if needed.

    4. Quantity

    An approximate number is fine at quote stage — we’ll firm it up once you see the mockup and pricing tiers.

    5. Deadline

    Tell us your in-hands date up front. Standard production runs about two weeks from approved mockup; rush options exist for firm launch dates.

    StepWhat we need
    ArtworkVector file, or a reference for our designers to recreate
    Style & sizeProduct dimensions folded or boxed
    Mil thickness1.5–3 mil, based on product weight
    QuantityApproximate is fine at quote stage
    DeadlineYour target in-hands date
    Key takeawayArrive with artwork, an approximate size and quantity, and your target date — that’s enough for us to return a photo-real mockup and bulk pricing within one business day.

    Ready to start? Get a custom quote — free mockups in 24–48 hours. Learn more about how we work, or browse more guides.

    More posts

  • Resealable vs. Self-Seal Poly Bags: Which Holds Up Better — Customized Poly Bags

    Call or Text us: (929) 605-4397

    HomeBlog › Resealable vs. Self-Seal Poly Bags: Which Holds Up Better

    Buyer guides

    Resealable vs. Self-Seal Poly Bags: Which Holds Up Better

    05/10/2026

    Most new customers arrive knowing they want a poly bag and unsure which closure fits their product. The two most common formats — resealable and self-seal — solve different problems, and picking the wrong one costs you either durability or speed.

    Here’s how they stack up.

    Resealable: built for reuse

    A press-to-close zip track lets a customer reopen and reseal the bag by hand, which matters for anything sold as a set, anything that might be returned or exchanged, or any product a customer is expected to handle before deciding to keep it. The tradeoff is a slightly higher per-unit cost and a marginally slower pack time.

    Self-seal: built for speed and finality

    A peel-and-seal adhesive strip closes permanently in one motion, no alignment needed, which makes it the faster bag to pack at volume and gives a clear tamper-evident signal that a package left the warehouse untouched. It is not meant to be reopened and resealed cleanly.

    Which one actually holds up longer?

    In terms of raw seal strength, self-seal wins — a properly applied adhesive strip won’t fail under normal handling. But “holds up” means something different for a reseal bag: a quality zip track is rated for dozens of open-and-close cycles without losing its seal integrity, which is the metric that actually matters for a bag meant to be reused.

    FactorResealableSelf-seal
    ReusableYesNo
    Pack speedModerateFastest
    Tamper-evidentLess soYes
    Relative costSlightly higherLower
    Key takeawayChoose resealable for anything a customer might reopen and reuse; choose self-seal for a faster, cheaper, one-way ship-and-open flow.

    Not sure which closure fits your product? Get a custom quote — free mockups in 24–48 hours. Learn more about how we work, or browse more guides.

    More posts

  • A Subscription Box Brand’s Guide to Poly Bag Packaging — Customized Poly Bags

    Call or Text us: (929) 605-4397

    HomeBlog › A Subscription Box Brand’s Guide to Poly Bag Packaging

    Subscription boxes

    A Subscription Box Brand’s Guide to Poly Bag Packaging

    04/19/2026

    A subscription box lives or dies on the unboxing moment, and the poly bag inside that box does more work than most brands give it credit for. It’s the first thing a subscriber touches after the outer box lid comes off, and it either builds anticipation or undercuts everything the rest of the box is trying to do.

    Here’s how established subscription brands think about it.

    The frosted reveal

    A Frosted Boutique Poly Bag is the most common choice for the primary insert bag — it hints at color and shape without fully revealing what’s inside, which keeps the reveal moment intact when the subscriber actually opens it. Fully clear bags spoil the surprise before the box lid is even off; fully opaque bags feel cheap and generic.

    Sizing for variable contents

    Because box contents change month to month, most subscription brands standardize on one or two bag sizes that comfortably fit their typical item range, rather than resizing every cycle. This keeps reorder timelines predictable and avoids scrambling for a new mockup every month.

    Reseal vs. one-time seal for inserts

    UseRecommended closureWhy
    Primary reveal bagResealable zip trackStays presentable if a subscriber saves or reuses it
    Secondary/protective insertSelf-seal stripFaster to pack, lower cost for a one-time seal
    Key takeawayUse a frosted, resealable bag for the primary reveal item, and a lower-cost self-seal bag for secondary or protective inserts — standardizing on one or two sizes keeps monthly packing simple.

    Ready to build a poly bag program for your next box cycle? Get a custom quote — free mockups in 24–48 hours. Learn more about how we work, or browse more guides.

    More posts